Blog
Using Jupyter Notebooks with Flox
Ross Turk | 5 April 2024

Sometimes you just need to use a tool for a moment. You don’t want to install it, you don’t want to deploy it, you don’t want to maintain it. You really would rather not configure it, and you certainly don’t want to ship it to the world alongside your project.
You just need to use it for a second, and then you want it to go away.
Maybe you need to read an ancient data format, but just long enough to extract what you need. Or maybe you want to lint some code you wrote in a language you almost never use, and only has a place in a small corner of your life. Or maybe it’s a tool that is intensely useful while you’re in one phase of your development process, but not another.
Since the release of Flox 1.0 and FloxHub, there’s a new way to use tools ephemerally: Flox remote environments.
When you need a notebook...
Frequently while in the research phase of a project I encounter an intriguing ipynb file that seems likely to contain something I am looking for. In those times, I want to be able to open that notebook and run what is inside...but I don't necessarily need to include a notebook server in my everyday stack.
Environments can be activated from FloxHub directly, overlaying new tools into the context you’re already in. We can use this to start a notebook server without installing anything globally.
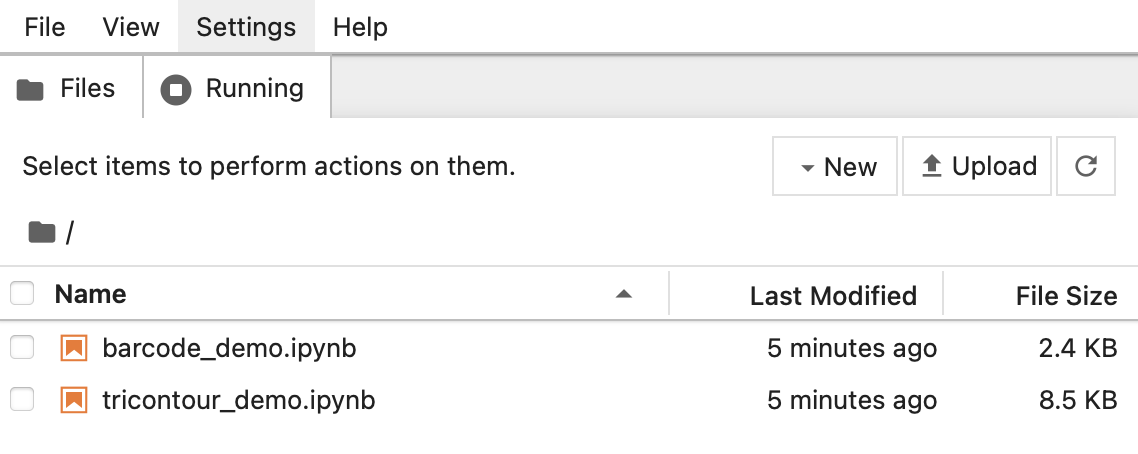
Let’s say we are in a directory with a few interesting notebooks:
~ % cd notebooks
notebooks % ls
barcode_demo.ipynb    tricontour_demo.ipynb
notebooks %
Using a FloxHub remote environment called flox/nb, we can add Jupyter tools into our current shell session. By passing -r to flox activate, we can specify the name of a remote environment that Flox will enable ephemerally.
notebooks % flox activate -r flox/nb
✅ You are now using the environment 'flox/nb' (remote).
To stop using this environment, type 'exit'

Jupyter environment ready - start notebook with 'nb'.
flox [flox/nb] notebooks %
We are now using a Flox environment whose definition lives on FloxHub.
This Flox environment contains all of the necessary Python components to support a Jupyter notebook server, which have now been downloaded from the Flox Catalog and made available in our path. It also sets an alias that can help us start the notebook server. We didn't have to install anything, which means we won't have to uninstall anything later.
Let's start it now:
flox [flox/nb] notebooks % nb
[...]
    To access the server, open this file in a browser:
        file:///Users/me/Library/Jupyter/runtime/jpserver-64073-open.html
    Or copy and paste one of these URLs:
        http://mylaptop.local:8888/tree?token=b5df059c9d323bbca1chb9407049a4695aa64081afbb632aa
        http://127.0.0.1:8888/tree?token=b5df059c9d323bbca1cb9407049a4695aab64081afbb632aa
[...]
When we open our browser window by clicking on either of those links, we can see our notebook server running with the contents of our directory.
Here I want to point out a few important things:
- We didn't have to mount any volumes in order to access our local files from this notebook server because it is running in the same user space where we are already working
- We also didn't have to forward any ports to gain access to this new service because it's running on the same host - again, where we are already working.
- This isn't running inside a container or a virtual machine. Even though it's ephemeral, it's still running on bare metal on your machine.
When we are done, we can exit the Flox environment the same way we’d exit any other subshell. Outside of the remote environment, our notebook server is unavailable and hasn’t left anything behind.
flox [flox/nb] notebooks % exit
notebooks % nb
zsh: command not found: nb
notebooks % ls
barcode_demo.ipynb    tricontour_demo.ipynb
notebooks %
How does it work?
So what's inside this environment? If you read part 2 of our Intro to Flox series, you know that you can use the flox list command with -c to print an environment’s manifest. This also works with remote environments if you add -r (for "remote") followed by the environment name.
Let’s run flox list -c -r flox/nb and look at this environment's manifest one section at a time.
[install]
jupyter.pkg-path = "jupyter-all"
pandas.pkg-path = "python311Packages.pandas"
matplotlib.pkg-path = "python311Packages.matplotlib"
numpy.pkg-path = "python311Packages.numpy"
pyarrow.pkg-path = "python311Packages.pyarrow"
sympy.pkg-path = "python311Packages.sympy"
pydot.pkg-path = "python311Packages.pydot"
plotly.pkg-path = "python311Packages.plotly"
This section defines packages to be included in our environment. The first one, jupyter-all, is a special package that contains a core set of Jupyter Notebook components. By adding it, we get the ability to start Jupyter servers and connect them with kernels.
That is a good baseline for running notebooks, but we have found that most notebooks we run also need a few other things. That’s why this environment also contains a collection of other tools:
pandas,numpy, andpyarrowfor working with special data types,matplotlibandplotlyfor charting output, andsympyfor algebraic functions.
In the next two sections, we see a variable and profile script that automates a few useful tasks whenever it encounters a requirements.txt:
[vars]
virtualEnv='./nb-venv/'

[profile]
common = """
  if [[ -d $virtualEnv ]]; then
    echo; echo -n "⚡️ Activating existing venv in $virtualEnv..."
    . $virtualEnv/bin/activate
    echo "done."
  fi

  if [[ -f requirements.txt ]]; then
    echo -n "🐍 Processing requirements.txt..."
    [ ! -d $virtualEnv ] && python -m venv $virtualEnv
    . $virtualEnv/bin/activate
    pip3 -qq install -r requirements.txt
    echo "done."
  fi

  alias nb="jupyter notebook --ip 0.0.0.0"
  echo; echo "Jupyter environment ready - start notebook with 'nb'."
"""
In the [vars] section, we find a variable containing the location for a Python virtual environment, which is currently set to ./nb-venv. This will make sure that a virtual environment is created (if needed) in the directory where the environment is remotely activated.
The [profile] contains a script that looks for the existence of that virtual envirionment and, if it finds it, activates it. If it sees a requirements.txt, it will create a new virtual environment and install the packages listed within it.
This is useful in the case where a notebook requires more than the set of packages provided by this environment. It allows you to create a requirements.txt before remotely activating flox/nb. When the environment activates, it will create a virtual environment. This is the only thing that this Flox environment leaves behind, and only if you ask for it.
The last two lines of the shell profile script create the nb alias we used earlier, which starts the server across all available network interfaces.
The final section of the manifest contains information about the supported platforms.
[options]
systems = ["x86_64-linux", "aarch64-darwin", "aarch64-linux", "x86_64-darwin"]
This environment been validated for use across Linux and Mac, ARM and x86.
Flox is easy to try. Install it and run flox search to find your new favorite stuff.